
How to Use the Wysiwash Sanitizer Pro
The new Sanitizer Pro was built with the professional user in mind. Whether you are a kennel owner, turf manager, janitorial engineer, or just demand the best of your cleaning products, the Wysiwash Sanitizer Pro was made for you.
Read this guide to learn how to set up, use and maintain your new Sanitizer Pro.
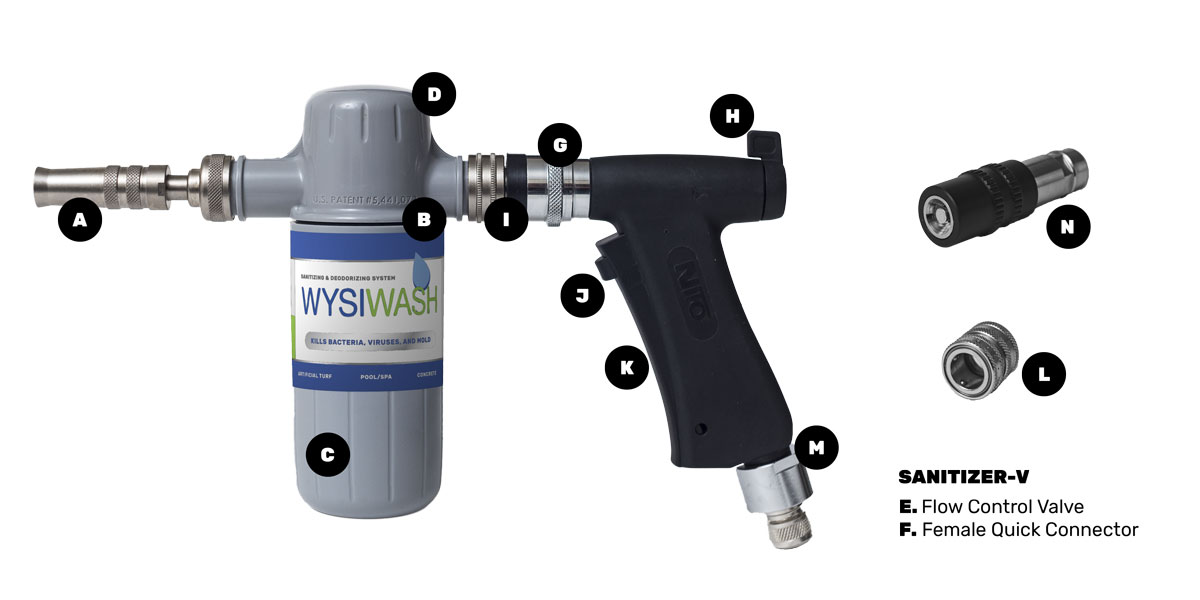
Part Descriptions
A. Adjustable Nozzle Changes the stream emitted from a gentle mist to a targeted stream
B. Hydro Seal Prevents leaking by securing the Caplet Container to the Hydro body
C. Caplet Container Holds the Wysiwash Jacketed Caplets
D. Hydro Body Regulates the amount of water that goes into the caplet container
G. Nozzle-End Female Quick Connector Attaches the Wysiwash Hydro Body to the Sanitizer Pro Handle
H. Pressure Lever Adjusts the water pressure
I. Hydro Body Connector Attaches to the Hydro Body and connects with the Nozzle-End Female Quick Connector
J. Trigger Release Button Press to unlock the trigger and stop the water flow
K. Handle Trigger Press to allow water to flow through the system. Automatically locks for easy sanitizing
L. Hose-End Female Quick Connector Connects the Sanitizer Pro to a standard garden hose
M. Male Nipple Provides a connection point from the Sanitizer Pro Handle to the Hose-End Female Quick Connector
N. Detachable Pro Nozzle Attaches to the Sanitizer Pro Handle to provide pressurized fresh water
Wysiwash Jacketed Caplets: The jacketed caplets are concentrated calcium hypochlorite—a proven disinfectant/sanitizer.
NOTE: Do NOT remove the plastic jacket from the caplet. If the plastic jacket has been removed or damaged, dispose of the caplet.
How to Attach the Sanitizer Pro to a Standard Garden Hose
Step 1: Pull down on the neck of Hose-End Female Quick Connector (Part L).
Step 2: With the neck down, pull the Handle away from the Hose-End Female Quick Connector (Part L).
Step 3: Thread the Hose-End Female Quick Connector (Part L) onto a standard garden hose.
Step 4: Pull back the neck of the Hose-End Female Quick Connector (Part L).
Step 5: With the neck back, press the Male Nipple (Part M) into the Hose-End Female Quick Connector (Part L).
How to Attach the Sanitizer Pro Handle to the Wysiwash Hydro Body
Step 1: Take the Pro Handle and pull back the Nozzle-End Female Quick Connector (Part G).
Step 2: With Part G pulled back, press the Hydro Body Connector (Part I)
Step 3: Release the Nozzle-End Female Quick Connector (Part G). The Pro Handle and Sanitizer Pro should lock together.
Step 4: Ensure the connection is secure by gently pulling the Hydro Body and the Pro Handle away from one another.
Step 1: Turn your hose on (water will not be released until you press the trigger of the Sanitizer Pro).
Step 2: Select the desired pressure by turning the Pressure Lever (Part H). You can also adjust the pressure while spraying.
Off: Turned down.
Medium Pressure: Turn half-way
Full Pressure: Pointing Upwards.
Step 3: Press the trigger (Part K) to start sanitizing. The trigger will lock automatically.
To adjust the spray from fan to jet, use the adjustable nozzle (Part H).
Step 4: To release the trigger, push the Trigger Release Button (Part J).
How to Switch to Freshwater Mode
Owners of the Sanitizer Pro love that they can easily switch between regular hose water and the Wysiwash Sanitizing solution. There are two ways to do this, depending on your needs.
Option A: Use the Pro Handle for Pressurized Spraying
This option is best:
- When you want increased pressure over your regular hose and to use fresh water only.
- When you want to have a fan spray with fresh water.
Step 1: Turn off the Wysiwash Sanitizer by pressing the Trigger Release Button (Part J). Do not switch from Sanitizing to Freshwater Mode while the Wysiwash solution is being emitted.
Step 2: Detach the Wysiwash Sanitizer from the Pro Handle with the Adjustable Nozzle (Part A) pointing down.
CAUTION: The solution inside the Wysiwash Sanitizer is concentrated and can stain. Take care to avoid contact with skin and clothing.
Step 3: Place the Wysiwash Sanitizer over a safe draining area. Tilt the adjustable nozzle (Part A) upwards so that the liquid can drain through Nozzle-End Female Quick Connector (Part G).
Step 4: Attach the Detachable Pro Nozzle (Part N) to use fresh water.
Option B: Use the Hose Only
If you do not need additional pressure or you are not ready to drain the Wysiwash Sanitizer Pro yet, you can remove the Wysiwash Sanitizer Pro from the hose.
Step 1: Turn the hose off.
Step 2: Pull back on the Hose-End Female Quick Connector (Part L) to detach the Pro Handle from the hose.
Step 3: Turn the hose on. There is no water stop in the quick connector, so water will flow freely.
Best for:
When you do not need additional pressure. (Ex. Watering plants.)
When you are not ready to drain yet, and want to switch back to sanitizing quickly. (For example: Rinsing off a piece of metal equipment before continuing to sanitize.)
How to Drain the Wysiwash Sanitizer Pro
Step 1: Disconnect the Sanitizer Pro from the Pro Handle by pulling the Nozzle-End Female Quick Connector (Part G).
Step 1: Point the Adjustable Nozzle (Part A) downward. This prevents the concentrated solution that remains in the system from spilling.
Step 2: With the nozzle downward, pull back the Nozzle-End Female Quick Connector (Part G) to disconnect the Pro Handle.
Step 3: Over a bucket or a sink, tilt the Adjustable Nozzle (Part A) upwards, so that the Sanitizer drains into the bucket/sink.
NOTE: The drainage is highly concentrated and can stain clothes. If skin comes in contact with the drain solution, rinse skin immediately.
How to Store the Wysiwash Sanitizer Pro & Jacketed Caplets
Leave the caplet inside the Sanitizer Pro between uses. If you've left the jacket on the caplet and drained the Sanitizer Pro properly, it should stay solid.
Store All Wysiwash Products in a Temperature Controlled Environment
Extreme changes in temperature can damage the caplets and Sanitizer. Do not store outside or in a shed or garage.
If the Sanitizer Pro is stored in freezing temperatures, it can break. Especially if it has not been drained properly (think of how pipes can freeze).
Failure to drain and store products properly voids the warranty.
Ideally, store the Sanitizer Pro upside down, with the male end pointing down at an angle. This allows it to continue draining and maximizes the life of the caplet. Put a plastic or glass tray or bowl under it to catch any additional drips.
Store Wysiwash Jacketed Caplets & the Sanitizer Pro out of the reach of children and pets.
Common Issues & Troubleshooting
Loose Connection: Sanitizer Pro Handle
If water is spraying out from where the hose connects to the Sanitizer Pro Handle, you may need to tighten the Male Nipple (Part M). To tighten, hold the top of Part M steady, while using a padded wrench/pliers to turn the bottom of Part M clockwise. Tighten snugly but do not overtighten!
Build Up or “Corrosion”
If the Sanitizer Pro has spots of calcium on it or seems clogged, give it a bath! Simply remove the caplet from the unit and store in a safe, plastic container to dry. Open the valve. Leave the caplet container disconnected from the rest of the Sanitizer-V, then soak the unit in white vinegar overnight (8 - 14 hours). To maximize the life of your unit, soak the unit monthly.
Sometimes people will call this "corrosion" but it's just built up calcium.
Calcium Deposits aka Hard Water Spots aka Residue
Calcium deposits can also build up on surfaces that you have sanitized. High gloss, painted, and textured surfaces will be more prone to show hard water spots. When the source water is hard/high in minerals, or the system has not been drained after use and primed properly it can also increase the chance of calcium spots.
Luckily, these are easy to remove or prevent by :
- Occasionally rinsing the surface with household vinegar to remove built up residue.
- Rinsing Wysiwash after adequate contact time on the surface.
- Squeegeeing after using Wysiwash.
Staining
At it's sanitizing concentration, Wysiwash does not stain. After speaking with many customers, even visiting and watching their protocols, we can confidently say that most stains can be avoided with proper protocols.
The most common cause of staining is skipping draining. Draining should be done every time you use Wysiwash. Be careful while disconnecting the Sanitizer-V from the hose and take caution to avoid the solution that drains out.
If staining occurs when Wysiwash is first started, find an area where splashing is unlikely to occur and prime Wysiwash for 60 seconds before continuing with normal sanitizing procedure.
Got more questions? Wysiwash is here for you.
Our customer support is awesome. Feel free to call us or email us at any point.

